Where have I been? I wish I had a story to tell, but alas, I have not. No good reason, not even a good excuse. But I'm back, so I'm happy with that. Let's see if I can manage at least one post a week for the rest of the year...
There has been some sewing, but not much, I will do a post of the things I have made since the last blog entry soon (but don't expect it to be exciting).
For now, I am off to update the to do lists. I haven't even thought about christmas yet, but I am still hoping to give only home-made gifts. A few late nights to come? Perhaps!
Thursday, November 19, 2009

Monday, August 10, 2009
Vintage Pattern Giveaway!
or: time to declutter :)
My gosh, this post has been a long time coming. Life seems to have been very hectic lately leaving me with little time to blog. But as of today we have a new super-fast internet connection so I can blog more easily when I get the chance.
Now, onto the patterns.... Please be aware that these patterns have been used (mostly by someone other than me!). Some have been cut and some have not. It's a bit of pot luck really :) If you would like one (or more) please leave a comment letting me know which one(s). I'm hoping at least some of these will be of interest to someone out there!
I should say, I'll leave this open for a week, till the end of Thursday 26th November :)
Kwik Sew #1954 sizes 8/10/12/14 Girls' Vest, Pants and Shorts

Style #2760 Size 5 Girls Dress

Little Vogue #1250 - Dress and Panties, Bonnet and Bib, Blanket and Pillow Cover, Shoes
This is size medium for weight 8-10kg and height 67-70cm.

Kwik Sew #2071 Girl's loose fitting jumpsuits
Sizes 4/5/6/7

McCall's #9322 Gown or Dress, Slip, Romper, Bonnet, Bootees
In sizes newborn, small & medium

Simplicity #5395 Boys' shirt, vest, bell-bottom pants, short pants or page boy suit with jabot
In size 5 *note the packet says "pocket welt missing and elastic guide all other pieces there"

Style #2437 Girl's dress
In size 5

My gosh, this post has been a long time coming. Life seems to have been very hectic lately leaving me with little time to blog. But as of today we have a new super-fast internet connection so I can blog more easily when I get the chance.
Now, onto the patterns.... Please be aware that these patterns have been used (mostly by someone other than me!). Some have been cut and some have not. It's a bit of pot luck really :) If you would like one (or more) please leave a comment letting me know which one(s). I'm hoping at least some of these will be of interest to someone out there!
I should say, I'll leave this open for a week, till the end of Thursday 26th November :)
Kwik Sew #1954 sizes 8/10/12/14 Girls' Vest, Pants and Shorts

Style #2760 Size 5 Girls Dress

Little Vogue #1250 - Dress and Panties, Bonnet and Bib, Blanket and Pillow Cover, Shoes
This is size medium for weight 8-10kg and height 67-70cm.

Kwik Sew #2071 Girl's loose fitting jumpsuits
Sizes 4/5/6/7

McCall's #9322 Gown or Dress, Slip, Romper, Bonnet, Bootees
In sizes newborn, small & medium

Simplicity #5395 Boys' shirt, vest, bell-bottom pants, short pants or page boy suit with jabot
In size 5 *note the packet says "pocket welt missing and elastic guide all other pieces there"

Style #2437 Girl's dress
In size 5

Monday, July 13, 2009
EB Bag Swap - What I Got!!
Have a look at what I was lucky enough to unwrap!! This came courtesy of Anna from Tillytom Designs. The parcel was beautifully wrapped in a gorgeous purple fabric with silver circles that I just love - still trying to decide what to do with it. I didn't get a photo of it all wrapped up because, well, I was too keen to open it!

The wonderful bag and the two bonus surprises - a purse and a matching hairtie and clip set!
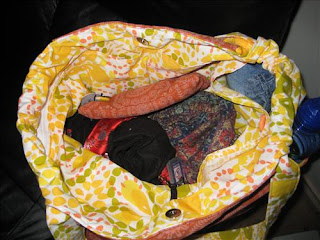

Loaded and ready to go! Inside and out...
Here is the bag ready to go to out to a party - the black and red thing is my ring sling, then there's a drawstring bag with a cloth nappy, handtowel (used as a change mat), facewasher in it. The little purse is sitting there. You can just make out the orange button on the right-hand side which is on a big pocket that wraps around - the pocket has a spare pair of pants and a couple more cloth nappies in it. On the left at the top of the bag you can see a white zip - that pocket has DH's wallet. Then there's a couple of little pocket which have my phone and a little book for DS. Then there's the outside pockets!! Photo on the right shows these - DS's drink bottle in the left one and mine in the right one.

One feature of the bag that I really appreciate is the little elasticised key holder. This is very convenient and should mean I will no longer be dropping my keys all the time.

The bonus purse is great - it easily holds my phone, wallet, lip gloss, with room for a couple of other things. This is handy as it means this items can live in the purse and if I'm going out on my own (very rare but it does happen) then I can just grab the purse and go.
To see some more expert pics, have a look here at the photos Anna took before she sent it!
P.S massive apologies to Anna for taking so long to blog, me and blogger have *not* been getting along.
Sunday, July 12, 2009
EB Bag Swap - What I Sent

Front of the bag
Five or so weeks ago I took the plunge and signed up for the EB bag swap. This is the third swap I've been in, but only the second that required me to sew!

Front of the bag with the flap opened - you can just make out the side pocket and the two along the front - all are hook and loop closing
I spent so long looking for fabric and a pattern. Eventually I decided upon this tutorial. My recipient doesn't have kids in nappies any more but still has three young kids. The design doesn't shout 'nappy bag' and is very functional as an every day bag for a busy mum.


The inside showing just how roomy it is. Note that according to the tute the inner pockets were supposed to be done in the same fabric as the lining, but I quite like it this way!
The tute was great, easy to understand and I am SO happy with how this bag came together. It is by far the biggest sewing project I have undertaken, I was worried that I wouldn't be able to pull it off, but I did! I am very glad I joined in this swap as it pushed me to do things that I would've otherwise have put off learning
forever.
New skills mastered (well, perhaps mastered is going a bit far...): zips, pockets, pockets with zips, pockets with elastic.
I am very tempted to make another one of these bags for myself, and possibly as gifts.
New skills mastered (well, perhaps mastered is going a bit far...): zips, pockets, pockets with zips, pockets with elastic.
I am very tempted to make another one of these bags for myself, and possibly as gifts.

The back of the bag - you can just see the full-width zip creating a very large pocket perfect for paperwork etc.
Pattern details: online tutorial - http://amingledyarn.wordpress.com/gallery/tutorial-hip-mama-diaper-bag/
What fabric/other materials I used:
The outer and lining fabrics were both quilters cotton that I purchased from Spotlight. I can't remember the name...
Information I want to share with regard to construction or sizing?
The only problem I ran into with the construction was that I used quilters cotton rather than the oilcloth that the tute used. As a result, the elastic on the inner pockets pulls the lining in as the fabric isn't structured enough to support it. I did interface the lining piece that has the two pocket in it, but I don't think it made much of a difference. The piece that has three pockets, I used a longer piece of elastic than recommended, and I think next time I would go longer again.
What I'd do differently next time
Two things: include a key ring and make the shoulder strap adjustable so it can be more easily worn across the body if need be.
Tuesday, June 9, 2009
A pilot hat for a cute little pilot

Well, winter is well and truly upon us here in Melbourne - brrrr! My little man needed a nice warm winter hat so I made this from some polar fleece I already had. What do you think? It was really very easy to put together, I'm hoping to try a reversible version this weekend.

Mothers' Day Sewing

A little late in posting this but better late than never - right?
The inspiration for this apron came from this tute (warning: if you've not visited craftster before, chances are you will spend hours wallowing in all the great tutes). I know mine doesn't look much like the tute, but it was my inspiration. The fabric for this started life as a single bed quilt cover (it's just a normal cotton though). So all that great gathering on the skirt of the apron - not my work! That's part of the skirt of the bedspread :)
What did I learn from this project? Don't blindly follow tutes! I love a good tute, they save me from thinking, and this was a nice, clear tute. But if I had of thought it through I could've saved a fair bit of time on all the straps - each of them was two pieces sewn together, turned and topstitched - very time-consuming. Next time I will cut the strap twice as wide and only have one seam to stitch. And there will be a next time, I love the way this turned out, I didn't want to give it away, lol. I love the fabric, I'm thinking it will make a great summer dress for me.
Oh, and I also made two matching pot mitts :)
P.S. sorry for the ordinary photo - we were racing out the door to mum's when I realised I hadn't taken a photo yet.
Wednesday, June 3, 2009
Putting his best foot forwards
DS has been on his feet for a month so it was time to put some shoes on them. I didn't want to buy any and I'm glad I didn't! These cost me next to nothing to make - I got a bag of craft leather for five bucks at the op shop and used some old jeans for the denim. The elastic was the only thing I paid retail for!
So, h,Here is my little man showing off his cute new shoes. They have leather soles and the rest is denim. I made them from a tutorial on this site. They go together very easily - even more easily if you extend the back piece and fold it over to make the casing like I have here. Have a look in the gallery on that site for some inspiration - so many cute pairs of shoes.

The cute little duckie shoe below is the first shoe I made with leather. It is lined with denim. It was harder to do than the leather/denim purely because of the bulk. I did one shoe a while ago, decided it was huge, and made the denim pair at a smaller size. The denim pair fit, but not for long so I made the second duckie one. In between the first and second shoes, I got a new sewing machine, and as a result, the second duckie shoe is much neater than the first. I find it much easier to go slow on the new machine.


So, h,Here is my little man showing off his cute new shoes. They have leather soles and the rest is denim. I made them from a tutorial on this site. They go together very easily - even more easily if you extend the back piece and fold it over to make the casing like I have here. Have a look in the gallery on that site for some inspiration - so many cute pairs of shoes.

The cute little duckie shoe below is the first shoe I made with leather. It is lined with denim. It was harder to do than the leather/denim purely because of the bulk. I did one shoe a while ago, decided it was huge, and made the denim pair at a smaller size. The denim pair fit, but not for long so I made the second duckie one. In between the first and second shoes, I got a new sewing machine, and as a result, the second duckie shoe is much neater than the first. I find it much easier to go slow on the new machine.


Subscribe to:
Posts (Atom)